

I’ve written before about the art of distraction and how it can help you forget your pain… for awhile. Arts and crafts that have helped me include long-stitch sewing, taking photographs of “glimmers” (the things that make me happy) and making either a mood-board or coloring-in a healing mandala.
I’ve also written a post about the power of particular colors in healing, and why you should apparently use blue ink while writing out affirmations or the aspirations you are hoping to manifest (here).
Today’s post is a combination of all of the above, and a bit more.
I’m a big fan of doodling, but I only recently came across (a decades old idea) called “Zentangle”. It is a very specific way of doodling – and I’ll outline it below – but know that I think ANY form of free-hand loose drawing will work to distract you from your pain.
The important thing is to sit in stillness for a moment and let your hand wander as your mind becomes tethered to the task at hand.
Zentangles were invented in the early 2000’s when a man called Rick interrupted his wife Maria while she was decorating the background of a calligraphy letter. She was startled by his arrival, and realized she had been in something of a trance (my word not theirs) which Rick equated with meditation. Together, they worked on creating a repetitive system they could share with others that turned black and white doodles on small squares of paper into an intentionally contemplative act: a Zen-tangle of lines. Since then, they have created a whole brand, with shops, apps, apprenticeships… and as their following grew, their workshops have shifted to encourage participants to create increasingly more complex projects and shapes with more and more color.
The official website includes a blog: Zentangle Blog, and there’s an Instagram post which shows a mini-movie of some of the steps: Instagram
Their approach always follows 8 steps:
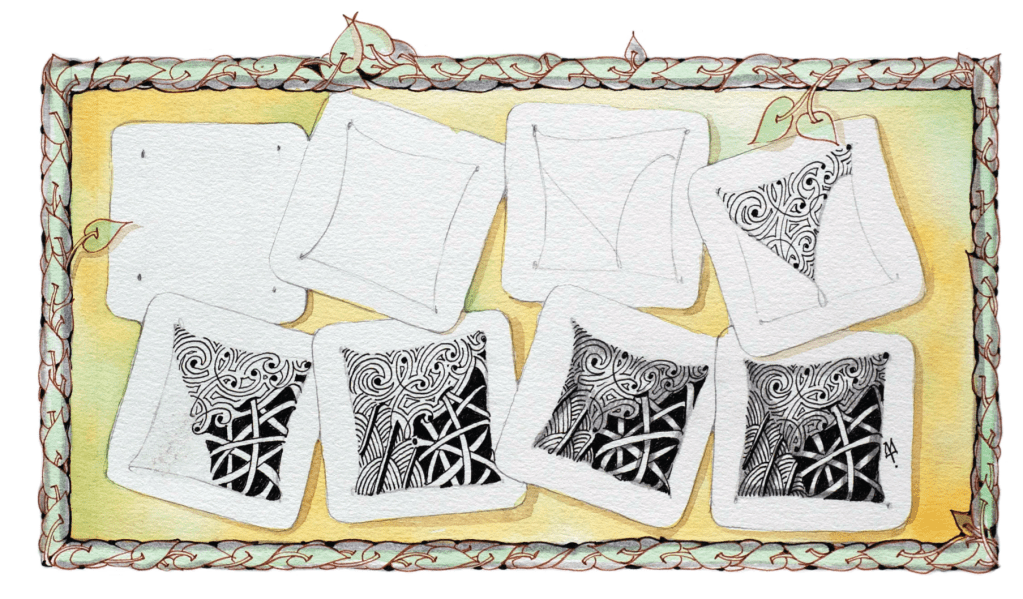
[Image source: and full description here)
Step 01 – Gratitude: “Get comfortable, take a few deep breaths and […feel grateful] for this opportunity to create something beautiful.”
Step 02 – Corner Dots: “…place a light pencil dot in each corner, about a pen’s width from the edges. Now it’s no longer a blank piece of paper.”
Step 03 – Border: “Connect those dots with a light pencil line, straight or curvy, to create a square.”
Step 04 – String: “Inside the border, draw a light pencil line […of] ‘string.’ […] It may be a curvy line that touches the edge of the border now and then, or series of straight lines that go from one side of the border to the next.”
Step 05 – Tangle: “…a predefined sequence of simple strokes that make up a pattern. […] Don’t worry about what it’s going to look like. Just focus on each stroke of the pen as you make it. Trust that you’ll know what to do next when the time to do it comes. There is no up or down to Zentangle art so feel free to rotate your tile in any direction that is most comfortable…”
Step 06 – Shade: “Add shades of gray with a graphite pencil to bring contrast and dimension to your tile. The black and white two-dimensional tangles transform through shading and appear three-dimensional.”
Step 07 – Initial and Sign: “This is art you created. You should sign it.”
Step 08 – Appreciate: “Hold your tile at arm’s length. Turn it this way and that. Appreciate what you just created.”
[To me the result above looks like a fancy throw-cushion!]
They have a whole YouTube channel with videos to explain and explore further: Zentangle – YouTube
I’ve never done a Zentangle before, but I decided to give it a go, following their prescribed approach (as best I could with materials on hand (square post-it-notes are a good size to work on, as was the jot-paper-pad I had on my table, the sort with the sticky top (that tears a little unevenly when you tug each page loose))). Here are the results:
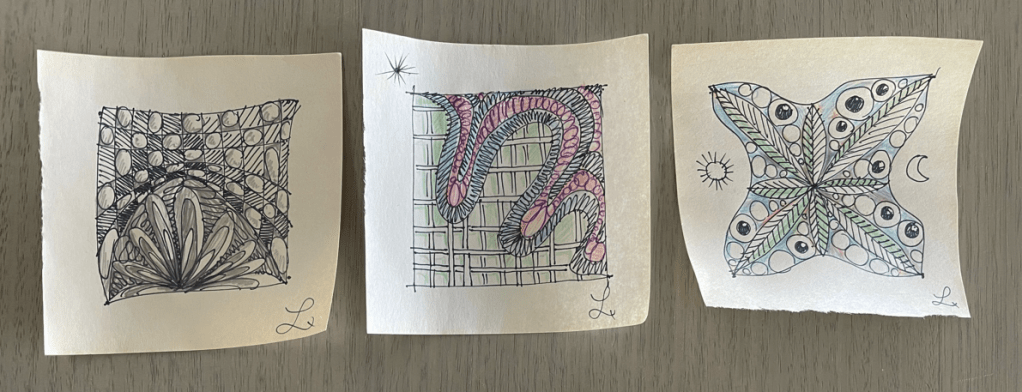
When I was following the “rules” it took some of the pressure off – I knew what to do when. That’s not to say I didn’t feel a bit of “am I doing this right?” anxiety rising in my mind with the first one. But as I kept going, the easier it flowed and the less I worried about right or wrong… eventually I just had fun and quit following the rules!
What I did notice, was that as my hand was moving my mind was not wandering off into the past, the future, ticking off imaginary to-do-lists, or deciding what my pain-scale was today…
For me, the doodling helped pass a pleasant (pain-free) half hour at the dining table.
That said, I’m a doodler. I’ve been creating borders to notes since I was in little school and have been given plenty of boss-glares at work on the assumption I’m not listening in a meeting because I was doodling (for the record: I WAS listening). For me, the process of Zentangling didn’t feel too difficult to pick up and get going.
If you’re NOT a natural doodler and you’re feeling a form of stage-fright staring at the blank page and wondering “what do I do?” remember those early steps of dots and borders will help you get going despite the trepidation.
But if you’re still worried about “what next?” here’s some ideas that might help you AND fill your work with mindfulness motifs. (They include links to previous posts if you’re more of a thinker than a mindless-pencil-pusher and need some more background information.) You can add the motifs into your Zentangle or just doodle them all on their lonesome – you’ll soon find the motion of a moving pen quite addictive!
- Mandala: any radiating circles and squares will give off mandala-vibes to remind you this is an act of mindfulness.
- A tree: trees remind me of a family tree, the Tree of Knowledge, the Tree of Life and forest-bathing… by drawing a straight trunk with radiating branches and spiraling roots, (as well as fruit and flowers) you’ll be filling up your paper in no time.
- Leaves and vines: draw long lines of leaves as a reminder to keep going and keep growing, like a happy healthy plant.
- Ripple-rings: imagine Basho’s haiku frog plip-plopping into a serene and ancient pond and create a series of concentric rings that recognize his passage (into the water and the journey back home) and hint at all the ripple-effects your life and actions have in the universe.
- Weaving: use a series of cross hatches (curved or straight) and imagine “reweaving” yourself in a new and exciting way.
- Stars: we are all made of stardust and energy, so fill your void with sparkle.
- Feathers: Icarus teaches us that we need to live a life of perpetual readjustment, not too high, not too low, so include feathers to show you’re ready to fly.
- Moons: whether drawn as crescents or choc-chip-cookies, the moon holds a sense of mystery and ever-changing power, so pop it into your sketches to feel connected to change.
- Stepping stones: these ‘blobs’ might not look like much, but you’ll know their meaning as you place them through your image, showing the way, and honoring your passage.
- Butterflies: are a beautiful motif of metamorphosis, and they can be as simple to draw as four tiny teardrops, or filled in with as much detail as you desire.
- Waves: healing is tidal, so show the ups and downs of wavy lines, that might occasionally curl and crest into a surfer’s dream ride.
- Bubbles and beads: strings of circles in the same, or different sizes, will fill a space quickly, while also reminding you that your healing efforts deserve celebration, by dressing-up and sipping (imaginary (for me)) champagne; hooray for all those inch-stones (which are easier to achieve than milestones!!)
Lastly, if you want to really get into this activity, think about what colors you want to add. What whispers “calm” to you, or “energy”, “joy”… or “healing?”
As I said, it was a simple little exercise (laboriously explained here – sorry) that brought me great joy. Whilst I might not become a full-time Zentangler, the practice has reminded me of the power of distraction, and the warm-glow that comes from doing something for pleasure rather than purpose.
Take care taking care of yourself as you go forth and be creative!
Linda xox

Leave a comment